Raspberry Pi 5 and kitsRaspberry Pi 4 and kitsRaspberry Pi 3B+ and kitsRaspberry Pi 400/500Raspberry Pi Zero and accessoriesRaspberry Pi PicoRaspberry Pi CMScreens for Raspberry PiRaspberry Pi Camera modulesCases for Raspberry PiHAT extension for Raspberry PiRaspberry Pi 3/2/+ accessoriesPower Supply for Raspberry PiRaspberry Pi memory cards with NOOBS
STM32 MicrocontrollersATmega microcontrollersFlipper ZeroTeensy - ARMAdafruit FeatherESP8266 / ESP32 WiFi ModulesM5Stack controller and accessories
Security camerasTuya Smart LifeBlitzWolfGate Automation SystemsBleBox WiFi Smart SwitchHousehold FansSwitchBotSmart LightingSmart SensorsClimate ControlSmart PlugsSmart Control DevicesSmart Locks and Access ControlSmart devices for petsHealth and personal care productsSmart Home Accessories
Sensors - modulesWireless Communication ModulesRelay modulesLCD/OLED/TFT DisplaysMotor controllersProgrammers and convertersConnectorsSwitchesVoltage RegulatorsBasic Starter KitPrototypingAudio Amplifiers / Speakers / OtherLED DiodesPassive electronic componentsActive electronic componentsElectromagnets and solenoidsCoolingWearable electronics and materials
Servo motors and accessoriesDC motorsStepper motorsVibration MotorsBrushless Motors and ControllersElectric Linear Actuators and CylinderWater pumpsStepper Motor MountsWheels and mounting parts for motors
AC voltage stabilizerAdjustable Lab Power SuppliesInverters DC/ACUninterruptible power supplyAlkaline BatteriesRechargeable batteryPower Supply AccessoriesBattery Chargers Ni-Mh / Ni-Cd / Li-Ion / Li-Pol / Li-FeLi-Ion battery charging and balancing boardsAC/DC Mains powers supply adapterPower Supplies AC/DCConnection Cables, ExtendersBatteries for power toolsPlug adapter EU/UK/USCharger for Electric Bikes
Soldering toolsBattery Welding Machines and accessoriesMeasuring equipmentChemicalsTweezersElectric toolsScrewdrivers and wrenchesHot Glue GunPlier and cutting nipperInsulation removal and crimping toolKnives and scissorsElectric engraver toolsMagnifying glassesInsulating materialsFlashlightPlastic enclosureStorage boxes and OrganizersUltrasonic cleanersLabel printersAIRCELL Air Cushion
CNC machines and accessoriesAluminum Extrusion ProfilesLinear ActuatorBrackets and Other Accessories for Aluminium ProfilesLinear guides and garriagesRollers on supportsTrapezoidal Screws and NutsLinear Steel RodsLinear bearingsBearingsTiming BeltsTiming PulleyLinear Rod SupportSpindle motors, converters and mount bracketsScrews and NutsCable ChainsDrills and Cutters
AEON Laser Engraving Cutting MachineFiber Metal Marking LaserCO2 Galvo engraving-marking machineUV Marking machineFLUX Laser Engraving Cutting MachinexTool LASER AND BLADE CUTTING MACHINEDiode laser engraving laserLaser machine spare parts and accessoriesEngraving MaterialsLightBurn Software
3D Printers3D scanner3D Pens3D Printing filamentsSLA 3D Printing resin3D Printer maintenance and cleaning3D Printer parts
Educational kits for beginnersEducational kits for advancedSNAP CIRCUITS kitsAbilix Krypton roboticsRobobloq roboticsLEGO Education
USB cablesVideo cables and connectorsUSB HUBComputer network cablesNetwork equipmentData storages and their accesoriesAudio cables and connectorsSpeakers activeKeyboard and MouseMicrophonesGamingLaptop AcessoriesComputer Power SuppliesCable OrganizersMonitorsWebcamsProjectorsUPS Uninterruptible power supplyOther Computer Accessories
Power BankHeadphonesMobile phone chargersPhone casesSelfie stickSmart WatchesPhone batteriesPortable speakers
Jump StartersCar Dash CamerasPhone holdersCarPlay and Android AutoMotorcycle IntercomsUSB car chargersCar FM modulatorEV Car accessoriesCar StorageCar diagnostic equipmentCar Cleaning ToolsMini CompressorsParking HeatersCar fuses and holdersLight sources
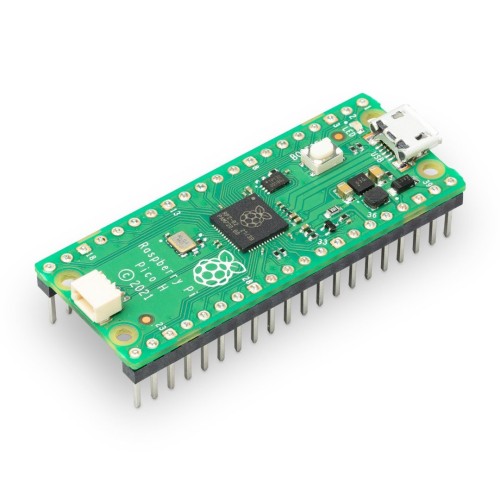
Raspberry Pi Pico H - RP2040 ARM Cortex M0+ - with connectors
Brand: Raspberry Pi
Product Code: AN-21573
Availability: Vilnius Store In Stock
Kaunas Store Out of Stock
Central Warehouse Out of Stock
Product Code: AN-21573
Availability: Vilnius Store In Stock
Kaunas Store Out of Stock
Central Warehouse Out of Stock
Ex Tax: 7.29€
The Raspberry Pi Pico module contains a proprietary Raspberry RP2040 microcontroller. The Pico H has factory soldered connections to the GPIO pins and a JST SH 3 pin 1mm pitch connector soldered to the JTAG pin. The RP2040 is a dual-core system based on the ARM Cortex M0+ clocked at 133 MHz. The Raspberry Pi Pico has 264 kB of SRAM and 2 MB of Flash memory. The system has 26 GPIO pins that work with 3.3V voltage and a built-in temperature sensor. Raspberry Pi Pico is programmable in C/C++ and MicroPython via a microUSB connector.


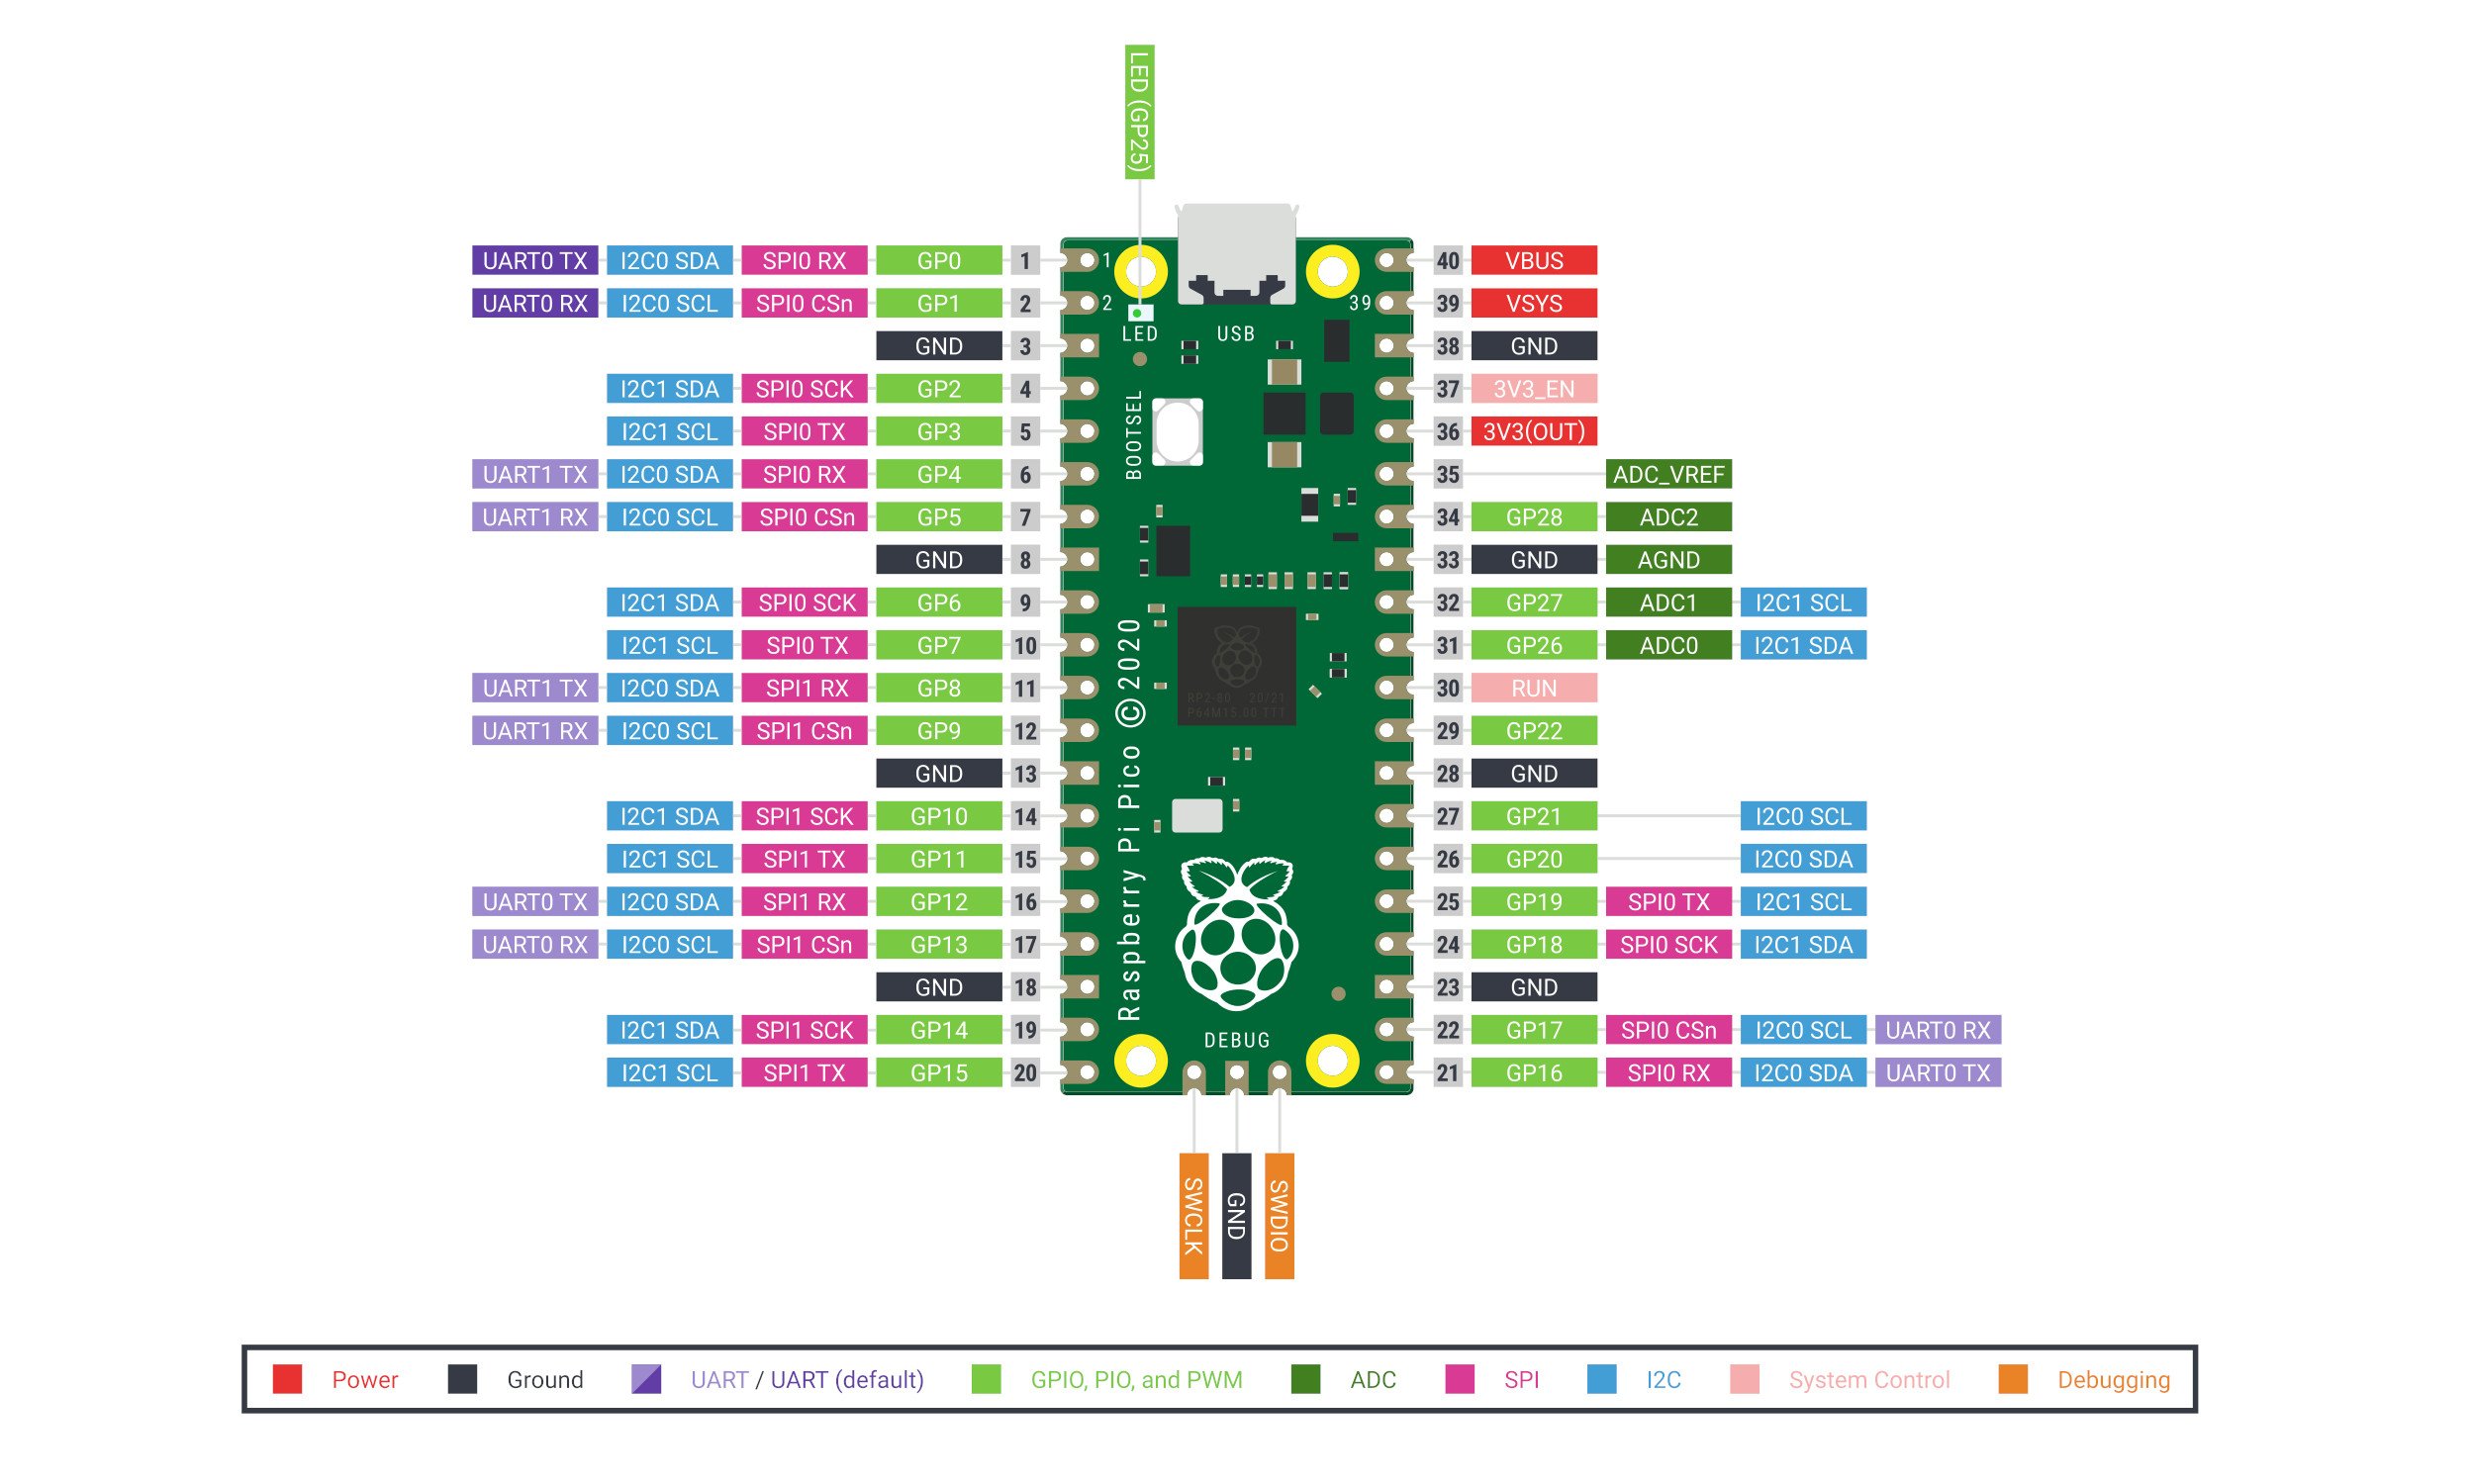
Raspberry Pi Pico H Module Pins
Raspberry Pi Pico has 26 GPIO pins, that is: 2x SPI, 2x I2C, 2x UART, 3x ADC 12-bit, 16x PWM. An additional 8 IO pins (PIO) are provided to support non-standard peripherals.
Raspberry Pi Pico H Power Supply
The Raspberry Pi Pico board connects to the computer via a microUSB connector. The module requires a 5V power supply from the USB port for proper operation. The board can also be powered from the VSYS pin from 1.8V to 5.5V using e.g. a 3.7V Li-Pol battery or 3x AA batteries.

Raspberry Pi Pico H Programming
Raspberry Pi Pico H is programmed in C/C++ or MicroPython. To load the program on the board, press and hold the BOOTSEL button, then connect the Raspberry Pi Pico to the computer with a microUSB cable. The computer will detect the board as a USB mass storage device called RPI-RP2, you need to drag and drop the program file to the RPI-RP2 volume. The manufacturer provides a repository of SDKs for C/C++ and MicroPython programming languages, which can be found at the following useful links.
Getting started with MicroPython
A program written in MicroPython is loaded onto a Raspberry Pi Pico board by connecting it to a computer via a USB cable and dragging and dropping a given code file. A sample UF2 file is ready for you to download and start using MicroPython.
- Download the MicroPython UF2 file.
- Press and hold the BOOTSEL button and connect the board to the USB port of the Raspberry Pi or computer.
- Once the Pico is connected to the computer, release the BOOTSEL button.
- The Raspberry Pi Pico will be mounted as a mass storage device with an RPI-RP2 volume.
- Drag and drop the MicroPython UF2 file onto the RPI-RP2 volume.
- Pico will restart with MicroPython active.
- You can access the REPL and MicroPython through the serial USB port.
Hello World C/C++
The first program every programmer writes is to write the text Hello World to the console, in this case via the USB serial port of the Raspberry Pi 4B.
Download the UF2 Hello World file.
- Press and hold the BOOTSEL button and connect the Raspberry Pi Pico to the USB port of the Raspberry Pi.
- The board will be mounted as a mass storage device with an RPI-RP2 volume.
- Drag and drop the UF2 file onto the RPI-RP2 volume.
- Pico will restart.
- Open a terminal on your Raspberry Pi 4B and run the commands:
- sudo apt install minicom
- minicom -b 115200 -o -D /dev/ttyACM0
- You should see Hello World in the terminal window
Specifications:
- System: Raspberry Pi RP2040
- Core: ARM Cortex-M0+ dual-core 133 MHz
- SRAM memory: 264 kB
- Flash memory: 2 MB
- Pins: 40 pins / 23 digital GPIO + 3 ADC pins
- Interfaces: 2x UART, 2x I2C, 2x SPI, up to 16 PWM channels
- Supply voltage: 5V (USB)
- Operating voltage of the logical part: 3.3V
- Power/data connection: microUSB
- Dimensions: 51.3x21x12.9mm


